- ComfortClick
- General
-
 Ideas
Ideas

bOS + IFTTT integration | Tutorial
Hi,
I've decided to create a small tutorial on how to integrate bOS and IFTTT by using bOS RPC service.
bOS Offers a JSON RPC Service for integration of bOS Server with other systems. The RPC service can be enabled by editing the BOSService.exe.config file. Value "EnableRPC" should be set to "True". Service port can be changed in the "RPCServiceUri" parameter. The firewall exceptions must be set manually in Windows OS.
I'll be using bOS RPC service to interact with IFTTT. It also can be used to interact with Tasker on Android. I use both services with bOS, but I'll be posting a very simple example here just for IFTTT, as I don't have time right now to explain the complex logic of Tasker.
The most important thing here, is to master the integration between IFTTT and bOS. Then you can do whatever you want...
Let's start with a very simple example, so that later you can adapt to your needs.
WARNING 1: The RPC service on bOS is used for beta purposes and doesn't provide any security. Use it only on secured networks behind firewall, or use it at your own risk.
WARNING 2: Please don't use this on end customers. Use it in your home, in your office demos, etc. But please don't use it for professional purposes. While bOS is a powerful tool, IFTTT and Tasker rely on the internet, on external servers and services, etc, so you should not use this for professional use, neither rely on external services that you can't physically control. If you're a professional installer, and you use this integration and somehow it fails, it's YOUR reputation!
For more information, please visit: https://www.comfortclick.com/Software/Manuals/BOSServer#RPCService
In this example, we'll be using just a Date & Time trigger on IFTTT to turn on a light on bOS. I know that bOS has timers, but this is just for demo purposes to show you off the bOS + IFTTT integration. You can change and adapt the IFTTT integration to your needs, for example "If a new e-mail drops on my Gmail, set my KNX RGB light to red", or "If my Netatmo Weather Station detects strong wind, close all my KNX shutters".
So, first things first. You'll need:
Step 1 - Port forward TCP port 81 (Please don't forward external port 81 to internal 81! Use a higher external port, let's say 55081)
Step 2 - A fixed IP external address, or a Dynamic DNS
Step 3 - Get the Path for the circuit / object you'll be using on bOS
I'll jump Step 1 and 2, and explain Step 3:
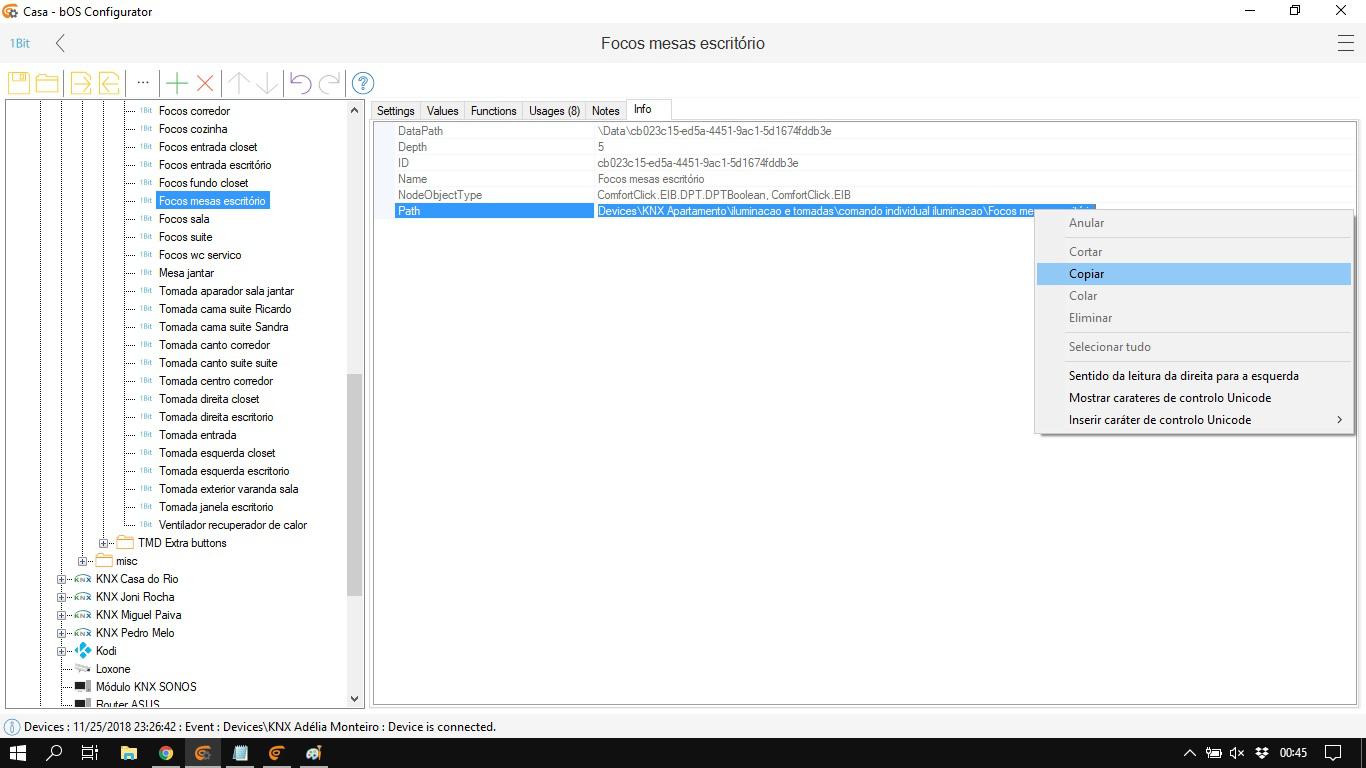
In this example, I want to use an office light. So I open my bOS Configurator, scroll down to my KNX Light, click on Info tab, and copy the Path:
Now we need to form the JSON body to POST on IFTTT service.
The Path I've copied is: Devices\KNX Apartamento\iluminacao e tomadas\comando individual iluminacao\Focos mesas escritório
But we need to double the backslashes on the Path, so we turn this: Devices\KNX Apartamento\iluminacao e tomadas\comando individual iluminacao\Focos mesas escritório
Into this: Devices\\KNX Apartamento\\iluminacao e tomadas\\comando individual iluminacao\\Focos mesas escritório
The simple SetValue body post is something like this:
{"objectName":"INSERT PATH HERE","valueName":"Value","value":"true"} where "value":"true" is to turn the value to true or 1. You can change to false or 0, or look for the other examples at: https://www.comfortclick.com/Software/Manuals/BOSServer#RPCService
So we past our path, and get something like this:
{"objectName":"Devices\\KNX Apartamento\\iluminacao e tomadas\\comando individual iluminacao\\Focos mesas escritório","valueName":"Value","value":"true"}
Now we're ready to go to IFTTT!
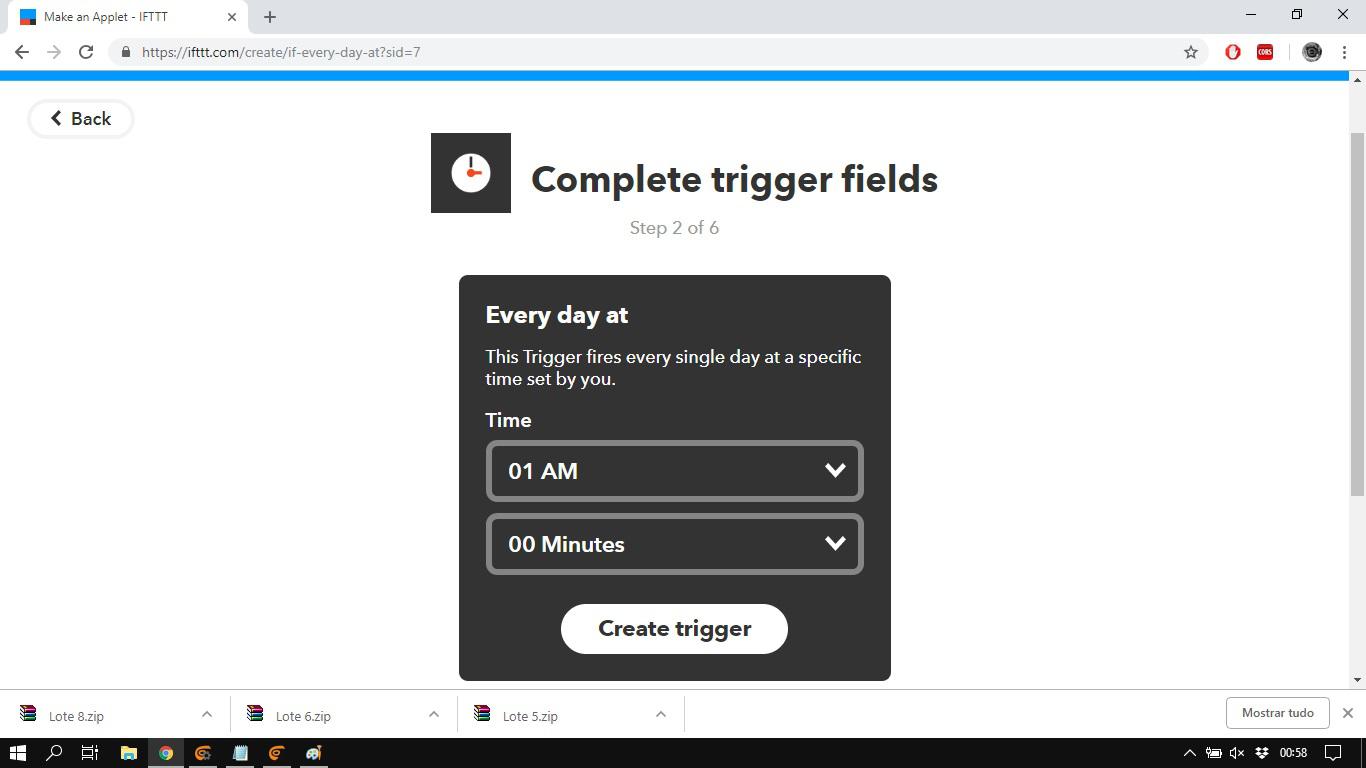
Choose to create a new Applet, click on THIS and choose your trigger. In this example we'll be using Date & Time.
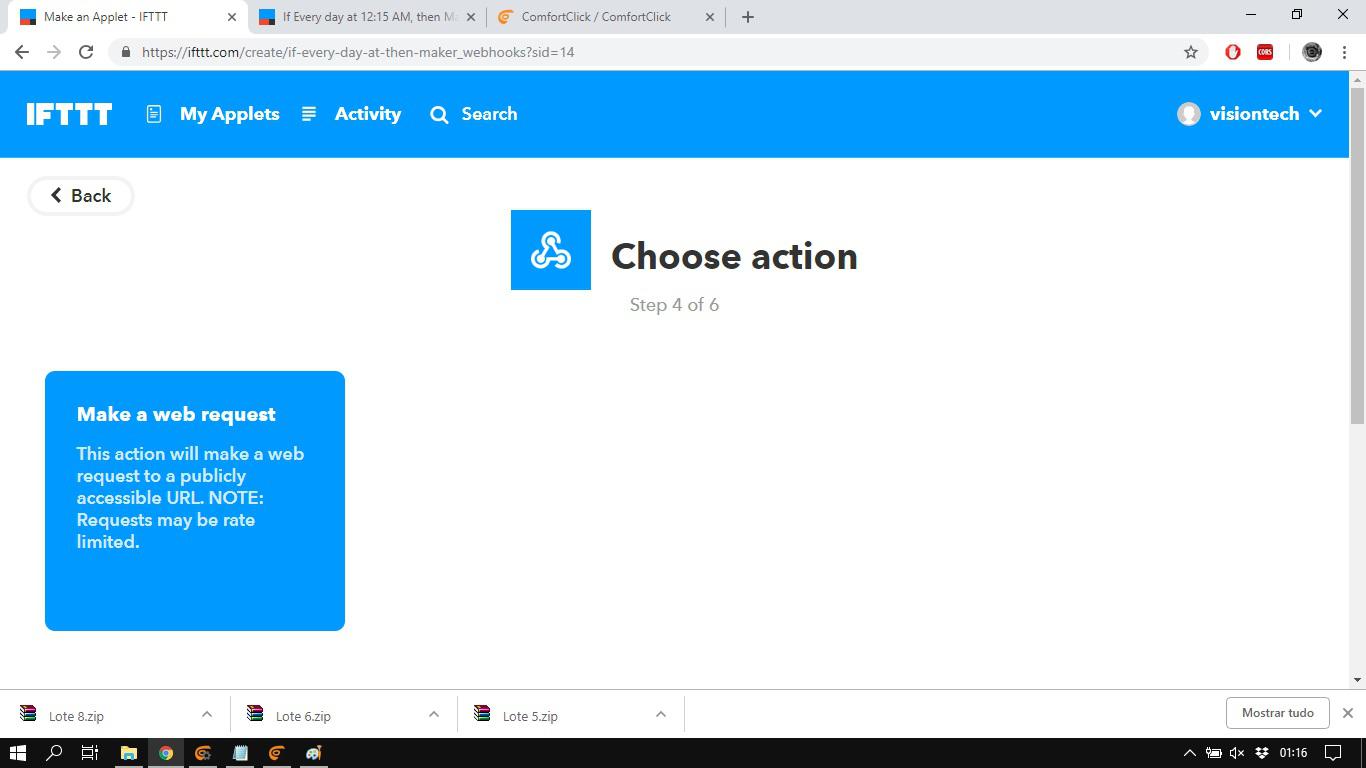
Now click on THAT, and search for Webhooks. Then click on Make a web request.
Now let's fill the data:
URL: http://your_ip_address_or_dynamic_dns_address:55081/SetValue
Method: POST
Content Type: application/json
Body: {"objectName":"Devices\\KNX Apartamento\\iluminacao e tomadas\\comando individual iluminacao\\Focos mesas escritório","valueName":"Value","value":"true"}
And that's it! Everyday at 1:00h the Office light turns on from IFTTT service.
This is just for demo purposes, so I've used a Date & Time trigger on IFTTT and a single light on bOS. With some patience, you can do whatever you want... call scenes, set other values etc.
Using IFTTT + bOS let's you exercise your imagination. For example: I use IFTTT as a translator between KNX and Xiaomi Yeelight, with bOS as the master. In my office, if I press a KNX button, bOS sends an action for IFTTT, which sends an action to Xiaomi Yeelight ledstrip.
I hope you enjoyed the tutorial. As soon as you master the integration, you'll do whatever you want with bOS and IFTTT.
Best regards,
Ricardo Pinto | VISIONTECH.PT
Customer support service by UserEcho

hi there, any idea how this is handled with the new basic auth?
Cheers
Hey there,
Not yet. I've only noticed the update yesterday, but I didn't had time yet to try out and adapt to the new auth.
As soon as I can handle it, I'll post a new update.
Best regards
cheers
Hello!
Here we have a short updated tutorial on how to integrate bOS and IFTTT using the new bOS’ RPC service based on the tutorial so kindly done previously by Ricardo Pinto.
bOS offers a JSON RPC Service for integration with IFTTT, Tasker and other services.
This tutorial will show bOS RPC service interacting with IFTTT in a simple task, but the important thing here is to understand how to set-up the RPC service so you can do more complex integrations.
RPC service offers HTTP basic authentication with username and password.
In this example, we'll be using IFTTT to turn a KNX light ON based on your location, so a geofencing scenario that could be changed and used to open a door, turn the music on, etc.
The possibilities are endless.
Step 1: Port forwarding
You can check your port forwarding on this site: https://portchecker.co/. If you have port forwarding already enabled, you can skip to Step 2
Click “Edit” and on the next page set the public address and click “Update”:
Step 2: Configure your RPC service
Step 3: Find your Device Path
Now we need to form the JSON body to POST on IFTTT.
The Path we have is: Devices\KNX\Razsvetljava\On/Off\Pisarna 1
We need to double the backslashes on the Path to form the JSON body to POST on IFTTT service, so now we have: Devices\\KNX\\Razsvetljava\\On/Off\\Pisarna 1
The simple SetValue body post looks something like this:
{"objectName":"INSERT PATH HERE","valueName":"Value","value":"true"} where "value":"true" is to turn the value to true or 1. You can change to false or 0 or look for other RPC examples at the end of this tutorial.
For our valueName, we have “Value”:
To turn the Light ON, our body post is:
{"objectName":"Devices\\KNX\\Razsvetljava\\On/Off\\Pisarna 1","valueName":"Value","value":"true"}
*the value, in this case “true”, must be written in lowercase.
Step 4: IFTTT
Click on “That”, select the “Webhooks” trigger and click on “Make a web request”:
URL
https://RPCUserName:RPCPassword@your_ip_address_or_dynamic_dns_address/API/RPC/SetValue
in our example:
https://RPC:RPCCOLIBRI@ip_address_or_dynamic_dns_address/API/RPC/SetValue
Method
POST
Content Type
application/json
Body
{"objectName":"Devices\\KNX\\Razsvetljava\\On/Off\\Pisarna 1","valueName":"Value","value":"true"}
Save and finish your Applet.
Done! Now every time we enter the specified area the KNX light will turn on.
This is a simple example for demo purposes, but with more complex commands you can do whatever you want... call scenes, set other values, etc.
To call an RPC Service an HTTP POST call must be performed with data content-type = "application/json";
Service offers the following commands:
SetValue
POST data example (Turn ON a light): {"objectName":"Devices\\KNX\\Light 1","valueName":"Value","value":"true"}
GetValue
POST data example (Get light status): {"objectName":"Devices\\KNX\\Light 1","valueName":"Value"}
CallFunction
POST data example (Send alert to user):
{"objectName":"Building\\General\\Users\\User","functionName":"SendAlert","value":["'Hello'"]}
I hope you’ve enjoyed the tutorial and please post here the examples and ideas you have using the new bOS’ RPC API.
Hello,
It's possible to get a string value ?
I try to get a IFTTT string value, but in bOS the string are always empty.
See below the setvalue Body:
{"objectName":"Devices\\IFTTT Husqvarana\\Etat Husqvarana","valueName":"Value","value":" {{Message}}"}
The field "Message" are an ingredient avaible in the Husqvarana Automower
Hi,
I'm not quite sure about what you pretend:
Do you want something from IFTTT to bOS, or from bOS to IFTTT?
Best regards
Hello again,
I think I got your request...
You're using Huskuvarna on IFTTT, and then on POST command your adding an ingredient and want to send that as a text to bOS, right?
I never used that, and I don't have access to Huskuvarna device, so I'll try to find another service and test it out.
I think that problem might be the {{ }} symbols, but I'll see what I can do.
Best regards
Hey,
I think I got it:
{"objectName":"Tasks\\String","valueName":"Value","value":"'{{OccurredAt}}'"}
You need to add " and ' before the ingredient, and ' and " after the ingredient.
Tried with a simple Button on IFTTT, with an ingredient called OccurredAt, and it works, my String value on bOS changed to April 18, 2020 at 04:08PM
So in your case it's probably:
{"objectName":"Devices\\IFTTT Husqvarana\\Etat Husqvarana","valueName":"Value","value":"'{{Message}}'"}
Try it.
Best regards
Hello Ricardo,
Thanks for you help it work with ' before and after.
how could we add 2 or more sensibo ac controlling device in comfort click because in tutorials they showing only one device , I did try to add but not able to do so kindly help someone if possible